Multi Tenant Architecture – 2

As mentioned in the previous post, Multi tenant architecture can be achieved via the following 3 ways:

  • Separate SCHEMA
  • Separate DATABASE
  • DISCRIMINATOR field

Spring Framework in Java does have an easy way to implement Separate Schema, Separate DB & Discriminator based multi tenant architecture.

However, you might have noticed that Multi tenant architecture implementation does not talk about the case – DIFFERENT TABLE PER TENANT

DIFFERENT TABLE PER TENANT

If you need to implement such a case in Java using Spring Framework then Spring does not provide out of the box way to have such kind of an implementation.

Dynamic creation of tables at run time is not possible using Spring JPA. All the entity classes have to be associated with their corresponding tables during boot up. In other words, Spring Data JPA works mostly with static schema.

Thus, dynamic tables creation (in order to obtain a multi tenant architecture) can be achieved by using entity Manager instance and writing native SQL queries  – by creating tables per tenant on the go and doing manual inserts, updates as and when required.

This, by default, when using Spring is done using DAO (Data access object) that provides a common interface to perform database operations with methods like save(), update(), findAll() which behind the scenes are doing native SQL queries.

References:

  1) Multi Tenancy Definition: https://en.wikipedia.org/wiki/Multitenancy

  2) Entity Manager:  https://docs.oracle.com/javaee/7/api/javax/persistence/EntityManager.html


Spring Transaction Management

What is a Transaction?

A transaction is a set of one or more statements that is executed as a unit. Either all the statements will be executed successfully or none of them. It follows the ACID principle where

Atomicity meaning either all changes should happen or nothing.

Consistency meaning changes should leave the data in a consistent state.

Isolated meaning changes should not interfere with other changes.

Durable meaning changes once committed should remain committed.

Flashback: JDBC Transaction Management

In JDBC API, the following steps are required to carry out transaction management:

Step 1: Disable auto commit mode by passing false value to setAutoCommit() method.

Step 2: Call the commit() method to commit the transaction if all the statements are executed as expected.

Step 3: Call the rollback method to cancel the transaction if any of the statement is not executed as expected.

Hence, a transaction management code using JDBC API will look like:

try { 

// get the connection object.
 Connection conn = DBConnection.getConnection(); 

// Step1: set the auto commit to false 
conn.setAutoCommit(false); 

// business logic goes here 
// .... 
// .... 

// Step 2: commit the transaction
 conn.commit();
 } catch(SQLException e) {
     try { 
       // Step 3: roll back the transaction 
       conn.rollback();
      } 
     catch(SQLException e1) { 
       // .... 
     }
 }

Pros of JDBC Transaction Management:

Scope of the transaction is very clear in the code.

Cons of JDBC Transaction Management:

Lot of repeated code as for every transaction the same commit, rollback lines need to be written again & hence it is error prone.

Spring Declarative Transaction Management

The easiest way to carry out transaction management using Spring Framework is through Spring’s @Transactional annotation over a method or a class.

Imagine a service class containing methods that are supposed to insert and read records in a database. The methods would look like:

@Transactional
public void insertData(Employee e) {
  // business logic to insert data.
}

public void readData(int empId) {
   // business logic to read data.
}


Things to notice in the above code:

  1. Only the business logic needs to be written while Spring takes care of the complete transaction. There is no need to write explicitly the transaction commit and rollback. This is done internally by Spring.
  2. Only the methods that result in the change in the state of the database need @Transactional annotation while the rest not. That said, the 2nd method is just a read from database and will not result in any changed database state therefore there is no need of transactional annotation.
  3. A class when annotated @Transactional means all its methods would be transactional then.
  4. Transaction management should not be done in the data access layer (DAO), but in the service layer so that your DAOs will perform the actions related with the database while the logic is kept separated in the service layer.

Docker for Developers

What is Docker?

Docker is a tool that is made to create, deploy and run applications by using containers where Containers allow a developer to package its application (libraries, dependencies etc)  and deliver as one package. This package would eventually then run on any machine system regardless of the configuration that different machines may have.

What is a Docker Container?

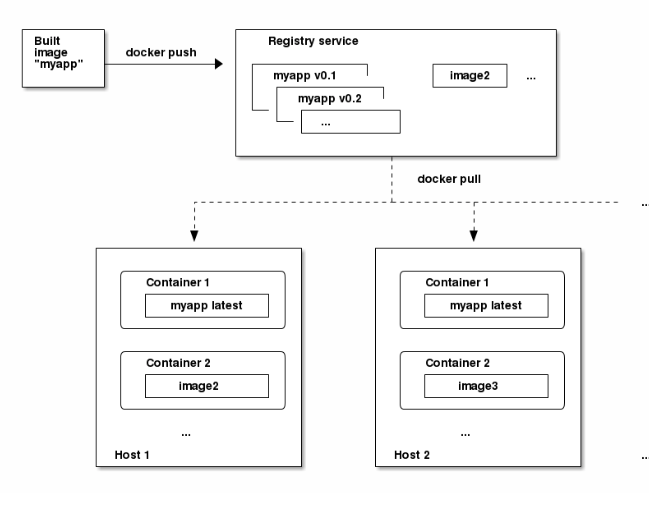
Docker containers are based on Docker images. Docker image is thus a binary which includes all the information for running a single container. Each image has a unique id and these docker images can be stored/retrieved in/from docker registry. A docker registry contains docker image repositories and each repository can have one or more docker images. The official registry provided by Docker is Docker Hub.  The difference between docker container, image and registry is shown through this figure (Image taken from docs.openshift.com) :

Screen Shot 2017-08-20 at 18.09.40.png

My Spring Boot Rest Api project on GitHub can be run using Docker and all the below explanation of images, containers would have reference to this project. Information on how to build the Docker file can be checked in README file of my GitHub project.

Docker images

Building a Docker Image:

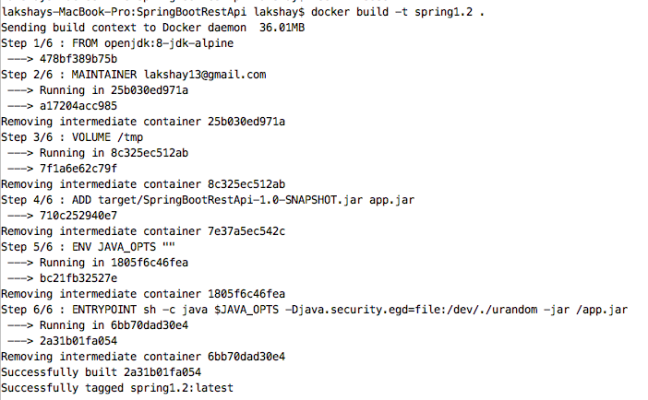
Docker image is built from a docker file. Once the docker file is built (docker file example) then a docker build command would be executed at the location where docker file is present in order to build the image.

      docker build -t <name of the docker image> .

For example, we run the command “docker build -t spring1.2 .” and upon success, below screenshot shows what message should appear.

Screen Shot 2017-08-20 at 18.19.09.png

Listing Docker Images created:

docker images

The image id associated with the image can also be determined using the command docker images. An image can be removed using its id. The below figure shows the different images that have been created with their image ids.

Screen Shot 2017-08-20 at 18.23.02.png

Removing a Docker image:

docker rmi <image id>

Docker image can be removed easily if its not yet associated to any container using the command mentioned above. However if it is associated to a container then first container needs to be removed using docker rm <container id> and then the image needs to be removed using docker rmi <imageid>

Docker containers

Running a docker container:

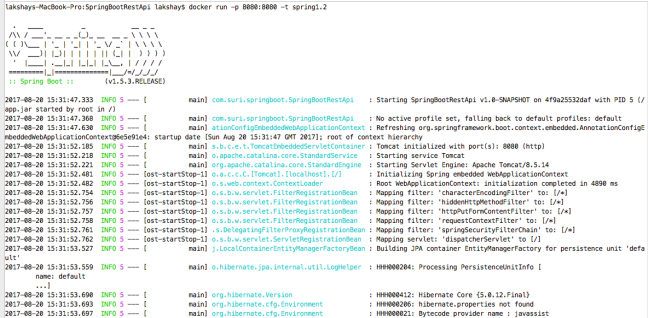
Docker image once built successfully implies a docker container can be run and the command to do the same is as follows:

For example: A spring boot application which needs to run on port 8080 and the name of the docker image is spring1.2 then docker container can be run using

docker run -p 8080:8080 -t spring1.2

Screen Shot 2017-08-20 at 18.31.49.png

Show currently running containers:

docker ps

Screen Shot 2017-08-20 at 18.34.38

Removing a docker container: 

docker rm <docker container id>


Aspect Oriented Programming with Spring

What is Aspect Oriented Programming (AOP)?

Aspect oriented programming (AOP) is a horizontal programming paradigm, where same type of behaviour is applied to several classes. In AOP, programmers implement these cross cutting concerns by writing an aspect then applying it conditionally based on a join point. This is referred to as applying advice. There are several examples of aspects like logging, auditing, transactions, security, caching, etc.

When AOP should be used?

Imagine there is class containing several methods and there is a need to perform logging action (common functionality) before the method call, after the method call and when the method returns.

Normally the way one would be adopt is to log before the method call, log after the method call, and log when the method returns for every method in the class like its shown here Non Aspect Oriented. This technique would involve a lot of CODE DUPLICATION. This is where Aspect Oriented Programming comes into play.

Basic terms related with AOP

Aspect: is the functionality that you want to implement. For instance, logging before every method call or after etc. Here Logging is an aspect.

Pointcut: is the expression that determines what method needs to be invoked where the functionality needs to be implemented. For instance, every method inside Addition class should have the functionality implemented would be written as

@Pointcut("execution(*com.project.MathOperation.Addition.*(..))")

Advice: When a particular pointcut expression is met, then the code that needs to be executed is called an advice.

JoinPoint: Execution of the method when the condition is met is called JoinPoint.

Weaving: The entire process of getting the method executed when the condition is met is called weaving

Practical Example of AOP

The following link to my github account shows how aspect oriented programming can be implemented with Spring and how it differs from non aspect oriented programming – Aspect Oriented Programming

Different ways of Dependency Injection

I explained in my previous post on Spring Framework [Dependency Injection] what is dependency injection? how spring finds the dependency? how does spring create and inject the service? etc. In this continued post, I will try to explain the three different ways of Dependency Injection.

  1. Field  Injection: Using autowired annotation on a field.
  2. Method Injection: Using autowired annotation on a setter method.
  3. Constructor Injection: Using autowired annotation on a constructor.

The order in which the injection takes place is constructor followed by field and then method.

Autowired annotation on a field is explained here in my git hub code [Autowired Dependency] and in the previous Dependency Injection post. In this post, we will cover the setter and constructor dependency injection.

Setter Based Dependency Injection:

It is done by container calling the setter method on your bean after invoking a no argument constructor or a no argument static factory method to instantiate your bean. Example of setter based dependency injection is shown here on my git hub code: Setter DI Example

Constructor Based Dependency Injection:

It is done by container calling the parameterised constructor of the class with each parameter representing the dependency on another class. Example of constructor based dependency injection is shown here on my git hub code: Constructor DI Example Code and Constructor DI Example Test


Spring Tutorial: Autowiring in Detail

How to autowire an interface when there are several implementations of that interface?

Problem: Consider an example where we have an interface defined as Math Interface which is implemented by two classes Add and Multiply . Now, the question is how to autowire the two classes? Autowiring like below on interfaces implemented by several classes will fail!

@Autowired

MathOperation mathOperation;

Somewhere in the class there is a call mathOperation.performOperation(); Spring is in trouble now as it does not know which performOperation() it should call? the one in Add or the one in Multiply class? The error that it gives is as follows: ERROR: Trying to find a bean but found two!

There are two solutions for this problem

  • Solution1: Use annotation qualifier specifying the instance of the class that will allow spring to identify which particular class to be invoked.

@Autowired

@Qualifier(value = addOperation)

MathOperations mathOperations1;

So now a call to mathOperations1.performOperation(); will call the method defined in Add class.

Similarly,

@Autowired

@Qualifier(value = “multiplyOperation)

MathOperations mathOperations2;

So now a call to mathOperations2.performOperation(); will call the method defined in Multiply class.

  • Solution2: Use the name of that specific implemented class object when auto wiring instead of using generic interface instance name. For example

@Autowired

MathOperations addOperation;

So a call  addOperation.performOperation(); will call the method defined in Add class.

Similarly,

@Autowired

MathOperations multiplyOperation;

So a call multiplyOperation.performOperation(); will call the method defined in Multiply class.

How to autowire an interface when there is only one implementation of that interface.

Imagine there exists this interface called ComplexMathOperation defined here: ComplexMathOperationInterface and the only implementation of this interface called DerivativeOperation defined here: DerivativeOperationClass . How to autowire in this scenario?

There are two simple ways to autowire:

  • Using the interface name@AutowiredComplexMathOperation complexMathOperation;

    With this a call to performComplexMathOperations() will have no issues.

  • Using the class name

@Autowired

DerivativeOperation derivativeOperation;

With this a call to performComplexMathOperations() will also have no issues     but this defeats the purpose of using interface for auto wiring as it directly uses the class name.